Moleskine Reloaded
…or, How to Rebind a Moleskine Notebook :
Make a Custom DIY Sketchbook!
Table of Contents
| I. | Introduction | VI. | Punching | 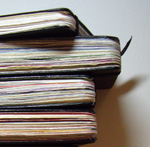 |
|
| II. | Stuff | VII. | Sewing | ||
| III. | Decisions | VIII. | Ripping | ||
| IV. | Cutting | IX. | Gluing | ||
| V. | Folding | X. | Finishing |
I. Introduction
The size and durability of the Moleskine Pocket notebook is perfect for my sketching needs, but the paper is not ideal. Although both “sketchbook” and “watercolor” versions are available, neither is well-suited to my particular requirements. And so, I have developed a process for replacing the paper (aka Moleskine Reloaded) while retaining all the other wonderful attributes of the Moleskine.
These instructions describe exactly how I do this process, but one can of course vary the project extensively to suit other notebook sizes, papers, or covers. The pages themselves are sewn together with a Coptic style binding. If you have never sewn a book before, don’t be scared off by this proposition. It is not as hard as it looks, really, and it’s a lot of fun.
My own reasons for the choices I‘ve made for my sketchbooks are:
- Moleskine notebook: Durable, interior pocket and elastic closure, nicely styled.
- Pocket Daily Planner style of Moleskine notebook: Small overall size (3.5 x 5.5 inches) is easy to take everywhere and encourages quick drawing, and thicker spine (1 inch) allows for more pages in the book.
- Watercolor paper: I mostly use ink lines with color washes and real watercolor paper greatly facilitates the wash process.
- Hot press paper: My pen glides easily on this (smooth) paper and it is a pleasure to draw on: it facilitates the line part of my process.
- 90 lb paper: This lightweight paper allows for more pages in a book.
- Fabriano Artistico paper – Folds well (doesn’t tend to crack as Arches does) and smells better when wet (than Arches does).
- Coptic binding: Durable, and allows book to open completely flat.
You may click on any of the photos or charts below to see a larger view. Now, let’s get started.
II. Stuff
Most of these materials can be found in a well-stocked art supply store, or online. Here is what you will need:
Materials:
- Moleskine: 1 Moleskine Daily Pocket Planner (3.5 x 5 x 1 inches). You can often get good deals on outdated versions after the new year.
- Paper: 2 full-size sheets (22″x30″), 90 lb paper. I use Fabriano Artistico Hot Press (available by the sheet).
- Thread: I use Lineco Linen Thread, but any heavy (“buttonhole” or “topstitching”) sewing thread will work fine.
- Glue: I use Lineco PVA, but any basic paper glue will work fine.
- Glue spreader: I use a disposable foam brush.
- Paint brush: I use a disposable foam brush.
- Black paint or ink: Nothing fancy needed, I use Golden Acrylic.
- Razor blade knife: like this or this, for example.
- Pencil
- Eraser
Tools:
- Scissors
- Needle: I use Lineco Book Sewing Needles, but any somewhat sharp needle that will accommodate your thread will do.
- Large Book (hardback or telephone book, for example)
Optional:
- Cloth ribbon (for a bookmark, if you want one and don’t want to reuse the Moleskine bookmark)
- T-Square (helpful for measuring the paper)
- Triangle 7 inches or larger (helpful for measuring paper)
- Paper clasps similar to these (helpful in the sewing process)
- Beeswax: Like this for example, if your thread is not pre-waxed (helpful in the sewing process).
- Corner punch 1/4-1/2 inch radius (for rounding page corners). I use a Small CornerAdorner
- Bone folder (or a metal spoon)
- 2 flat rubber bands, 2-4 inches in diameter
- Paper Trimmer
- Wax Paper or Parchment Paper (helpful for gluing)
- Paper Towels (for wiping excess glue)
III. Decisions
- Number of Signatures: Lets figure out how many signatures (sub-sections) you will be putting in your book. If you are going to use watercolor or collage in your book, plan on using 11 signatures. If you will be using dry media only (pen, pencil, etc.), you can use 12 signatures.The Daily Planner comes with a detachable address book in the back. Decide if you want to keep it or not. If you do, deduct one from the number of signatures you will be working with.Circle how many signatures you will be including:
10 11 12
- The Moleskines also come with a ribbon bookmark. Decide if you want to keep the bookmark, replace it with your own (more festive?) ribbon, or dispense with the bookmark altogether.
IV. Cutting
- Following the diagram below, measure and cut 15 pieces from each sheet of paper. This orientation will allow for best folding later as the paper will be folded with its grain.
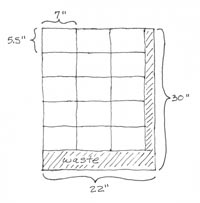
Cut Sheets As Shown Measure carefully and ensure that your corners are square. I use a t-square and triangle on my coffee table to measure and mark three long 7″ wide strips, then I cut out the strips with scissors. The strips are further divided down to final size with my paper trimmer.
V. Folding
- Take 20 or 22 or 24 sheets (depending on whether you are making 10, 11, or 12 signatures, respectively) of the 7″ x 5.5″ sheets you just cut and fold each of them crosswise so that the resulting piece is 3.5″ by 5.5″. Be as accurate as you can, but don’t worry about some variation. Crease the fold with a bone folder or the back of a spoon, but don’t overdue it: crease should be firm but not knife-like.
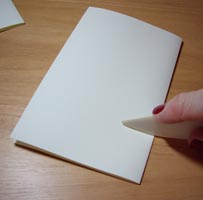
Creasing the Fold Pair up sheets by placing one folded sheet inside another to create sets. These sets are called “signatures” in book binding lingo.
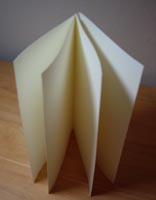
One Signature
VI. Punching
- Fold one of your remaining 5.5” x 7″ pieces of paper in half as you just did for the others. Cut lengthwise about 1 inch from the fold so that you have a V-shaped paper “trough”. We will make a punching guide from this piece. Measure and mark dots on the inside crease 1/2 inch from each end, 1 inch from each end, and 2.75 inches from one end (5 dots total). Using your needle, punch a hole through each dot right on the crease from the inside. Mark one end of your guide “top”. Optional: I like to use a marker to put some color along the edges opposite the fold so that I can see them easily against the book sheets later. I also punch a hole in one side of the guide so I can see what is underneath it.
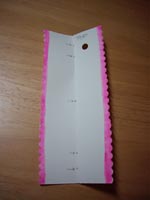
Punching Guide - Punch 5 holes in each of your signatures as follows: Open a hardback book or phone book and seat the signature’s crease in the book’s crease. The book will serve as a cradle to steady your signature while you punch it. Place the guide on top of your signature carefully aligning both, and ensure that all sheets are well seated in the cradle. Use your needle to punch though each of the five guide holes and through the signature. Use a pencil to lightly mark the outside of each signature as to which end the guide “top” was oriented. Even though the holes are (in theory) symmetrical, it will be important to sew them together as aligned with the punch, so noting this now is important.
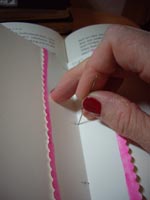
Punching the Signature
VII. Sewing
- Some general guidelines about sewing:
- The thread tension should be snug but not so tight that the holes are strained. The most important thing to is to pull your thread through each hole completely and not leave unintended slack loops. Check and double check this often, especially on the inside which is sometimes out of view.
- If the thread is getting tangled a lot, wax it (if you haven’t already) and/or cut it shorter and add a new strand when needed by double knotting it on the outside of the spine. The frustration of tangled thread is not worth it so take action if necessary.
- If the needle will not easily go through a hole, ensure that the pages of the signature are aligned and increase the hole size by gently passing the needle through from the inside of the signature.
- I find that the extensive handling during the sewing process leaves enough finger oils on the outside of the signatures to make them slightly resistant to watercolor. To avoid this I use disposable latex gloves for the sewing process. You really do not need to do this, and I don’t bother with the gloves for the rest of the project anyway.
- Measure and cut a piece of thread about 80 inches long. If your thread is not pre-waxed, wax it by dragging it over the edge of a hunk of beeswax a few times. This will give it some stiffness and help keep it from tangling when you sew. You can skip this waxing step but it makes the sewing process much easier.
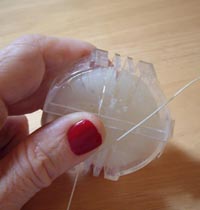
Waxing the Thread - We will now sew the signatures together. The resulting page set is called the “bookblock” in book binding lingo. We will be building the stack of signatures from the bottom up. Let’s refer to the signatures as A, B, C, D etc. from bottom to top, and to the holes as 1,2,3,4 and 5 from left to right. The first 2 signatures will be sewn together using one technique, and the rest of the signatures will be added using a different technique.

Hole Identification Chart
- Thread the needle.
- Take a signature and align it with end you labeled “top” on the left. Sew into hole A-1 from the outside of the spine, leaving a tail of about 4 inches hanging out of the hole. From the inside of the spine, sew out of A-2.
- Place another signature on top of the first with the end labeled “top” on the left. Sew into B-2, and out B-3.Sew into A-3 and out A-4.>/p>Sew into B-4 and out B-5.Sew into A-5 and out A-4. A-4 now has 2 threads passing through it, as will most of the holes we sew through to attach signature B to A.
- Sew into B-4 and out B-3.Sew into A-3 and out A-2.Sew into B-2 and out B-1.
- Check that your thread has been completely pulled though each of the holes sewed, and then attach your long sewing thread to the short tail left in A-1 with a firm double square knot, right on top of the hole. This knot won’t show, so doesn’t have to be pretty. Do not cut either thread; continue to sew:
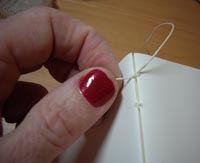
Making the Knot - Place a third signature on top of signature B, with the end labeled “top” on the left. Sew into C-1 and out C-2.
- Going from right to left, sew under the threads that span A-2 and B-2.
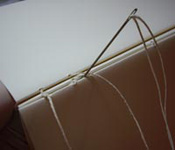
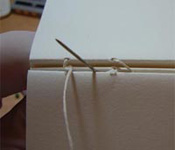
Sewing under A-2/B-2 Sew into C-2 and out C-3.
Sew under the threads spanning A-3 and B-3 from the right to the left.
Sew into C-3 and out C-4.
Sew under the threads spanning A4 and B4 from the right to the left.
Sew into C-4 and out C-5.
- Sew under the threads spanning A-5 and B-5 from the right to the left. Now sew under the thread coming out of C-5 from the left to the right.
- Place a fourth signature on top signature C, with the end labeled “top” on the left. We will now attach D to C as we attached C to B, but in the opposite direction:
- Sew into D-5 and out D-4. Sew under the threads spanning B-4 and C-4 from the left to the right.
- Sew into D-4 and out D-3. Sew under the threads spanning B-3 and C-3 from the left to the right.
- Sew into D-3 and out D-2. Sew under the threads spanning B-2 and C-2 from the left to the right.
- Sew into D-2 and out D-1. Sew under the threads spanning B-1 and C-1 from the left to the right.
- Sew under the thread coming out of D-1 from the right to the left.
- Repeat steps “f” through “i” to add more signatures until all your signatures (10,11 or 12) are sewn. You may find the paper clasps helpful to hold groups of signatures together as you sew.
- Double check the entire book for any accidental slack thread loops. Secure the free end of the sewing thread by knotting it to the sewn thread loop just below it (spanning 1-1 or 5-5) with a firm double square knot, right on top of the hole.
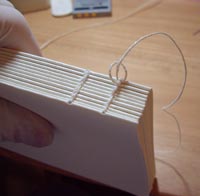
Making the Knot - Dab a bit of glue onto each of your thread knots to help secure them. Let dry. Trim the ends of the sewing threads near each of your knots, about 1/8” away.
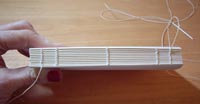
Bookblock after Sewing
- Examine the bookblock you have sewn. It need not be perfect, but if any pages stick out in a significant way from the top, bottom or front trim them to match the rest of the block. Sewing the signatures in the same orientation in which they were punched (via your “top” notations) ensures that your 5 stitched spine rows will be straight. If they are not straight it doesn’t hugely matter though since the spine will be covered up in this project.
VIII. Ripping
It is now time to (lovingly) rip apart the Moleskine in preparation to receive its new innards.
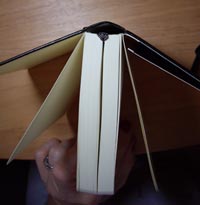 |
| Center Section to be Removed |
- Open up the Moleskine at the front between the stiff first sheet (the one that says “In case of loss…”) and the next thinner sheet (the one that says “Moleskine Pocket Diary”). Open the pages wide, gently prying them apart if necessary to do so.
- Using a razor knife, cut between these two pages to free the block of thin pages that make up the bulk of the book. Be careful; do not cut the stiff front page and do not cut the black cover.
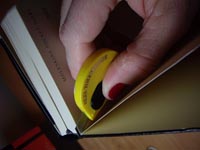
Making the Cut - Spread the stiff back page and last thin sheet wide open as you did in the front.
- Release the block of thin pages by making a similar cut at the back of the book, leaving the last stiffer page attached to the cover.
- If you intend to reuse the bookmark ribbon, peel it off the back of the thin page block and reserve it. Discard (recycle!) the block of thin pages.
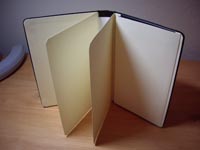
Moleskine Cover After Pages Removed - The edges of the cover where you made your cuts will be a bit rough from old glue that is there. Lightly clean them up with small scissors, but be careful not to cut the stiff end pages. These rough edges won’t show and need not be perfect.
- The inside of the Moleskine spine is white. Since the Coptic binding allows a bit of the spine to show through between the signatures it looks best if the entire cover is black. Use your black paint or ink to paint the inside of the spine. You don’t have to be too precious about this but do hit all the white that shows. It is okay to get some black on the inside of the stiff end pages as well. Let dry.
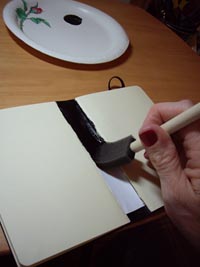
Painting the Spine
IX. Gluing
- Are you going to have a bookmark ribbon in your book? If so, glue the first 1/2 ” or so of the ribbon to the interior side of the back stiff page about 1/8″ in from the edge, so that rest of the ribbon is resting up away from the book. Let dry.
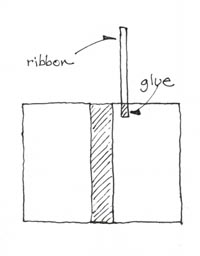
Placement of the Ribbon - We are going to glue the new bookblock into the Moleskine cover by gluing the first and last pages of the bookblock to the inside of the stiff end pages still attached to the Moleskine cover. Place the bookblock into the cover and examine how it will line up when glued. It is important to know where you are going before you start throwing glue around! You will be aligning the spine of the bookblock with the back (folded) edge of the stiff end pages and lining up the top and bottom of the bookblock as best you can with the top and bottom of the stiff end pages.
- Spread glue across the entire face of one side of the bookblock. It shouldn’t be goopy, but don’t skimp on glue. In particular, make sure there are no dry patches and use enough so that the glue won’t dry before you’ve had time to carefully place the pieces together.
- Carefully place the glue covered bookblock onto the inside of the back stiff page of the Moleskine cover, starting with the spine side and aligning the sewn edge of the bookblock with the folded edge of the stiff page. Note that you should not be putting glue on, or gluing anything to, the spine of the Moleskine cover.Press the sheets together working from the inside edge to the outer edge, sandwiching in the end of your bookmark ribbon if you have one. Use a bone folder or the back of a spoon to gently compress all parts of the sheets together. Make sure there are no bubbles or creases (not usually a problem because the papers involved are relatively stiff).
- Wipe any glue that may have squeezed out along the edges of the page. Don’t worry if the two pages have not aligned perfectly. As long as the spine-side edges are basically aligned and it’s not too far off up or down, it will be fine. The fore edge may not perfectly align. Use some wax paper or parchment paper to protect the Moleskine cover from glue drips, if the glued area is leaking at all.
- Now spread glue on the other side of the bookblock and glue it to the inside of the front stiff page of the Moleskine cover in a similar manner. This is a bit trickier because you don’t have as clear a view of the inside as the first time around, but now you’re a pro so it won’t be a problem! It is most important that the spine-side edges of your glued pages are well secured, as that is where most of the stress will be. Ensure that this edge is firmly seated for drying by placing the closed book under some weight and/or placing flat rubber bands around the glued pages right against the crease. Let dry.
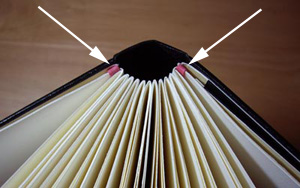
Placement of Rubber Bands
X. Finishing
- Once dry, examine your book and if needed trim the fore edge of the pages for alignment. It doesn’t have to be perfect so don’t go overboard here; just make sure the pages don’t protrude beyond the Moleskine cover. Look at the first and last pages that were glued and see if you want to trim their fore edge if one side significantly overshoots the other.
- Gently erase the ”top” notations you made on each signature. If you have a bookmark, fold it down and slip between the pages of your book.
- If you like you can leave the page corners sharp, but you can also round them with a punch (fun!) or scissors (time consuming), or trim them at an angle with scissors (pretty easy). I use a corner punch and this step of the project is my favorite. It really pulls the book together and finishes it nicely.
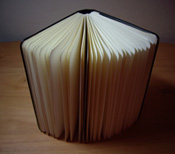
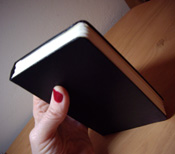
The Final Product



September 4th, 2017 at 6:35 am
Doesn’t the 90lb paper wrinkle with the wash, doesn’t the wash bleed onto the next page?
February 15th, 2017 at 12:24 am
[…] Moleskine Reloaded : Sketching and Sketchbooks – …or, How to Rebind a Moleskine Notebook : Make a Custom DIY Sketchbook! Table of Contents […]
February 14th, 2017 at 5:28 pm
[…] Moleskine Reloaded : Sketching and Sketchbooks – …or, How to Rebind a Moleskine Notebook : Make a Custom DIY Sketchbook! Table of Contents […]
February 6th, 2017 at 4:55 am
[…] Moleskine Reloaded : Sketching and Sketchbooks – I. Introduction. The size and durability of the Moleskine Pocket notebook is perfect for my sketching needs, but the paper is not ideal. Although both “sketchbook … […]
April 20th, 2016 at 2:18 am
[…] Moleskine Reloaded : Sketching and Sketchbooks – Make Your Own Moleskine City Notebooks … December 21st, 2015 at 10:52 pm […] Moleskine Reloaded : … How to Rebind a Moleskine Notebook : Make a Custom … […]
April 7th, 2016 at 1:17 pm
[…] Moleskine Reloaded : Sketching and Sketchbooks – I. Introduction. The size and durability of the Moleskine Pocket notebook is perfect for my sketching needs, but the paper is not ideal. Although both “sketchbook … […]
March 6th, 2016 at 6:27 pm
[…] Moleskine Reloaded : Sketching and Sketchbooks – I. Introduction. The size and durability of the Moleskine Pocket notebook is perfect for my sketching needs, but the paper is not ideal. Although both “sketchbook … […]
February 23rd, 2016 at 5:29 pm
[…] Bind my own journal […]
February 5th, 2016 at 1:53 pm
[…] to sew the pages together as book blocks. Instead of reinventing the wheel I’m just going to link to a tutorial that I think explains it well if you follow the numbering system she uses. Just skip to […]
December 21st, 2015 at 10:52 pm
[…] Moleskine Reloaded : Sketching and Sketchbooks – …or, How to Rebind a Moleskine Notebook : Make a Custom DIY Sketchbook! Table of Contents […]
November 29th, 2015 at 9:31 am
[…] Used Moleskines via Trumpetvine […]
November 21st, 2015 at 1:07 pm
[…] but I found some great tutorials on the interwebs that helped me through. I mostly followed this tutorial from Trumpetvine Travels. It is actually about how to put different paper in a Moleskine notebook, but it had the clearest […]
August 31st, 2015 at 1:36 am
[…] Years ago I stumbled across Trumpetvine Travels, and that website inspired me to take up sketching. The artist (who I believe is called Martha McEvoy) makes her own sketchbooks by adapting Moleskine ones. Click here to read her tutorial on how to do this. […]
January 28th, 2015 at 8:51 pm
LOVE IT!!
thank you so much
November 18th, 2014 at 9:19 pm
[…] Moleskine Reloaded : Sketching and Sketchbooks – …or, How to Rebind a Moleskine Notebook : Make a Custom DIY Sketchbook! Table of Contents… […]
November 18th, 2014 at 8:18 am
[…] Moleskine Reloaded : Sketching and Sketchbooks – …or, How to Rebind a Moleskine Notebook : Make a Custom DIY Sketchbook! Table of Contents… […]
July 24th, 2014 at 11:07 am
Alternatively, you can back my kickstarter and get the perfect sketchbook !!
https://www.kickstarter.com/projects/theperfectsketchbook/the-perfect-sketchbook-for-travel-artists-and-art
May 11th, 2014 at 12:09 am
Thank you so much for this really easy to understand tutorial! Have been looking for a while now for a turtorial that doesn’t require fancy equipment and is easy to follow and this is exactly it!
October 9th, 2013 at 12:37 am
Wow! thank you for such a detailed tutorial on bookbinding. I have been reading your section on how you sketch. I love your dedication and generosity in posting all the details. Thank you so much!
May 8th, 2013 at 5:41 am
Just a short note to say Thank You! I’ve made my fist watercolor sketchbook as you suggested, … but made my own covers. It was a great ‘tutorial” as I was able to make it in an afternoon. Clear, concise, and best of all … easy to follow! Blessings to you, and to those you care.
April 8th, 2013 at 5:06 am
[…] glued down. I thought about alternative ways of re-attaching the front cover– I’ve seen tutorials online where people slice the stiffer pages off of the inner page signatures in order to reload the […]
January 24th, 2013 at 5:57 pm
Hello. I used your guide as an inspiration for my own notebooks. I just wanted to thank you. It’s a wonderful thing. I’ve already done three, with my own cover, with colour cloth. And I’m going to make more, as a gift to people I really care about. One of my friends loved it.
Thank you, again.
June 10th, 2012 at 8:51 pm
You are an absolute legend. I am amazed at your dedication. Your journals look wonderful – just made, and complete.
A true artist dedicated to their creative process is what you are.
I would love one of these journals as I am starting to use watercolor myself. I wonder if I can be as meticulous as you?
Thank you for sharing your process. It is much appreciated. : )
April 12th, 2012 at 3:06 am
I couldn’t resist from commenting. Exceptionally well composed!
January 10th, 2012 at 12:45 am
Remake it with Write In The Rain waterproof paper.
November 16th, 2011 at 9:45 pm
Thank you very much! These are very clear with pictures and diagrams that made things so much easier
September 28th, 2011 at 8:46 am
Thank you so much for that step by step guide, I will most certainly be
having a go at that, never seen a corner punch though, hope not too
hard to find, I agree finishes the job perfectly.,
September 13th, 2011 at 3:45 am
Very nice but I have two questions:
1. Why would you buy an expensive notebook and then tear it apart?
2. Your “finished product” has rounded corners — how to you achieve them?
Thank you.
September 7th, 2011 at 2:55 pm
oh yes, finally, just what I’ve been looking for, all across Italy I’ve seen folks make these books but out of leather and I wanted to try the same, that’s when a little free time allows for it. Your post will help tons, thanks
August 9th, 2011 at 3:08 pm
I can’t describe with words how grateful I am! I’ve been looking for a great guide in ages!(…well actually in some days – but it feels like ages ;)) My new diary – here I come!
Thank’s! 😀 😀 😀 😀
November 21st, 2010 at 10:14 pm
THANKS SO MUCH FOR THIS TUTORIAL!!!!! im a little scared to mess it up but u explained everything so well that im gonna put my fears aside and begin binding my sketchbook!!!
October 7th, 2010 at 6:39 am
Very clear instructions on this bookbinding technique. Enjoyed making my first book (and finishing it) thanks to this web page.
September 29th, 2010 at 3:43 am
Now, I have a question – my problem is, I use the vertical A-4 watercolor-appropriate Moleskine, and I wanted to get a horizontal one, but had no idea that they don’t exist. Someone refered me to this post so I could rebind my Moleskine a horizontal way.
Only problem is, I can’t fold the vertical Moleskine’s pages in two, because I want to keep the A4 size of the pages – on the other hand, I still want it to have the same flat-on-its-back quality a Moleskien would have.
Any suggestions as to how I may work this out?
September 27th, 2010 at 1:05 pm
[…] Rebind a Moleskine sketchbook with watercolour paper […]